
Whether or not you’re capturing in RAW or JPEG, Lightroom supplies highly effective instruments that can assist you convert your photographs to the format that most accurately fits your wants. On this article, I’ll present you how you can convert RAW to JPEG in Lightroom in only a few easy steps.
By now, each photographer is aware of that to maximise picture high quality, dynamic vary, and shade accuracy, you want to set your digicam to RAW picture format and keep it up.
Additionally it is evident once you import your new photos to Lightroom; you retain them within the authentic RAW format. And solely after performing all vital modifying steps, on the very finish of the picture modifying workflow, do you exchange RAW recordsdata to JPEG for publishing.
To transform RAW to Jpeg in Lightroom, choose the picture in Libray or Develop Module, right-click on it (Choice Click on on Mac) and select the Export possibility from the menu. Within the export settings window, set picture format to JPEG, and for high quality, select 100% to maximise picture high quality or set high quality to 80% for internet publishing.
Nondestructive Enhancing and RAW to JPEG Conversion
If we wish to be fully correct, there is no such thing as a approach to convert RAW to JPEG in Lightroom.
Let me clarify.
Lightroom makes use of nondestructive modifying when coping with RAW recordsdata. It implies that the unique file at all times stays intact and isn’t modified by this system.
For instance, shifting modifying sliders in Develop Module don’t change the unique RAW file. As a substitute, Lightroom writes all modifying steps to the sidecar file in XML format. And for the preview, Lightroom generates a JPEG picture by studying and making use of modifying values from the sidecar file. The unique RAW file at all times stays untouched.
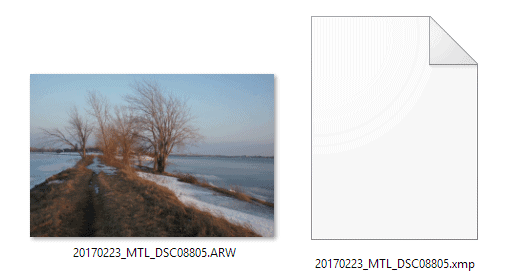
Once we say “changing RAW to JPEG,” it implies that Lightroom creates a brand new model of the edited picture in JPEG format. You find yourself with 2 picture recordsdata, one authentic RAW file and one other in JPEG format, with all edits utilized.
How To Convert RAW To JPEG In Lightroom
1. Choose the RAW Picture Meant for JPEG Conversion
Earlier than changing RAW to JPEG, choose the RAW picture you intend to transform.
You’ll be able to provoke RAW to JPEG conversion in each Library and Develop Modules of Lightroom.
You’ll be able to choose any RAW file in Lightroom by merely clicking on it. The spotlight across the picture is a affirmation that it’s chosen.

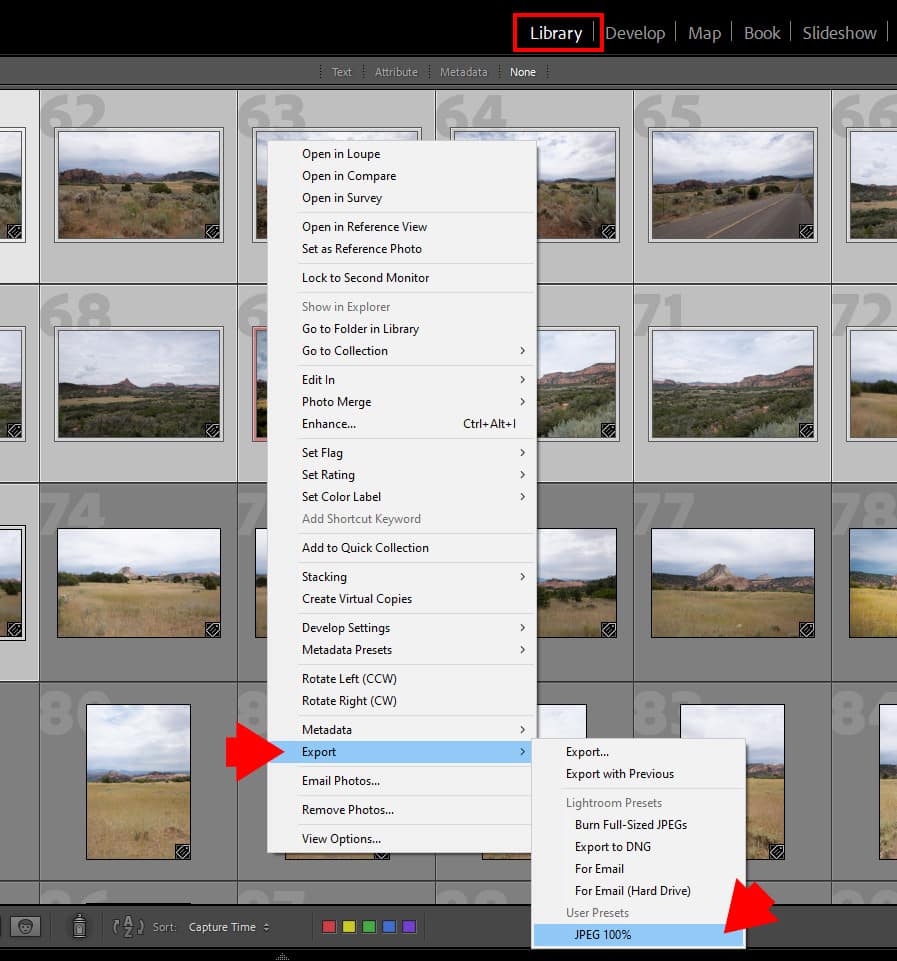
2. Activate the Export Module
Proper-click (Choice-click) on the chosen RAW file and select the Export possibility from the menu.

Finally, you’ll be able to provoke the export course of by going to the Foremost Prime Menu and choosing the ‘Export…’ possibility. Or you should utilize the keyboard shortcut Ctrl+Shift+E.
I at all times use the “proper click on” possibility whereas changing RAW recordsdata to JPEG. I discover it extra handy. However it’s a private choice.
3. Set the Conversion Format to JPEG
Clicking the Export possibility (step 2) will activate the Export Setting Window.
First, you want to choose the export picture format beneath the File Settings panel.
- Picture Format: from the drop-down menu, choose the JPEG possibility
- Colour Area: choose the sRGB possibility.
- High quality: for picture high quality, transfer the slider all the way in which to 100%. It tells Lightroom to save lots of the JPEG picture in the very best high quality.
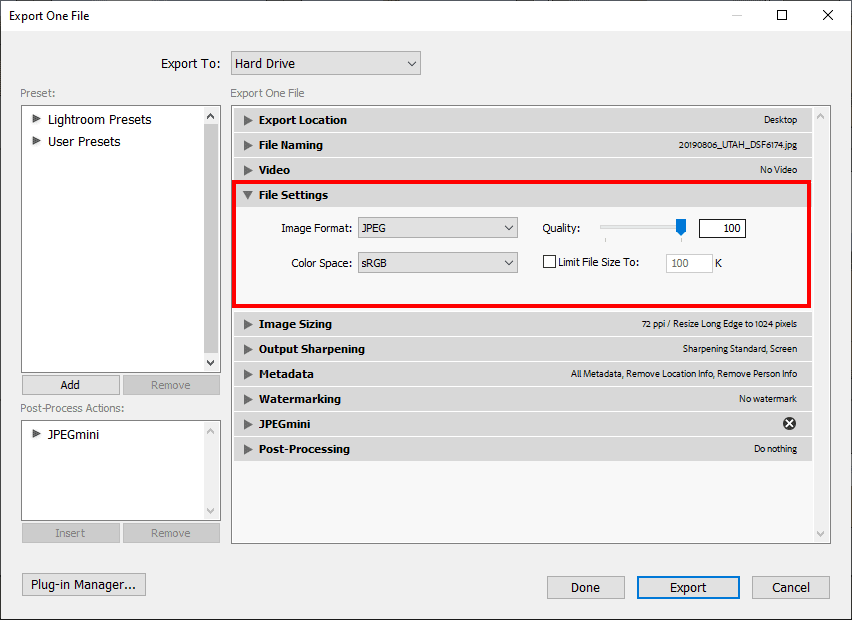
Saving the JPEG picture at 100% high quality is good once you want your JPEG picture for archiving or printing functions.
If you wish to study what setting to make use of to save lots of JPEG photos for the aim of internet publishing, test my devoted tutorial right here: Lightroom Export Settings for Internet, Print, Fb…
4. Specify the Vacation spot for the Transformed JPEG Picture
Lightroom gives loads of choices the place to retailer transformed JPEG photos. In our case, we’ll save the ultimate picture to the native folder of the pc’s arduous drive.
First, choose the Onerous Drive possibility from the ‘Export To’ high menu. It signifies that you just wish to save the exported file to the native arduous drive.
Subsequent, from the Export Location part, choose the ‘Desktop’ possibility. It tells Lightroom that you just wish to save the JPEG file to your pc’s desktop. You’ll be able to most likely guess that saving the transformed JPEG picture to your Desktop will not be the one possibility in Export Module. Nonetheless, it’s the easiest and quickest manner of choosing Export Location with out going into the rabbit gap of countless Lightroom choices.
And to make it simpler to find the transformed picture in your Desktop, test the choice ‘Put in Subfolder’ and provides it a reputation, say ‘JPEG Export.’ The choice tells Lightroom to routinely create the JPEG Export folder in your Desktop and sage the ultimate JPEF picture there.

5. Hit the Export Button
And eventually, you press the Export button to provoke the RAW to JPEG conversion.

If you convert just one picture, the conversion goes quick, virtually instantaneously. However for those who convert a lot of photos, the conversion course of can take some time.
As you most likely discover, the Export Setting Window has a wide range of export settings. Nonetheless, for the present tutorial, we used solely a barebone of settings to transform RAW to JPEG.
In case you are in search of a mo detailed info on Lightroom export settings, test the next tutorials:
How To Convert RAW to JPEG In Lightroom Utilizing Presets
One of many predominant strengths of Lightroom is the facility of presets. Lightroom has 9 sorts of presets: Develop Presets, Import Presets, Meta Knowledge Presets, Copyright Presets, and so forth. The Lightroom presets means that you can automate repeated duties making a complete modifying workflow quick and environment friendly.
It’s not a shock the Export Setting Window has preset performance. As a substitute of fidgeting with countless export settings each time you exchange RAW to JPEG, it can save you the specified configuration as a preset and reuse it each time you exchange a picture.
Let me present you ways simply you’ll be able to create an export preset in Lightroom.
Choose the RAW picture within the Library or Develop Module.
Proper-click (possibility Click on) on the chosen picture and select the Export possibility from the menu.
From the Export Settings Window, choose the next choices:
- File Settings:
Picture Format: JPEG
Colour Area: sRGB
High quality: 100%
Maintain the remainder of the conversion choices untouched.

If you end with the conversion settings, it’s time to save them as a preset.
On the backside left nook of the Export Settings Window, find the Add button and press it.
The New Preset menu will seem.
Give the title to your new preset, one thing like ‘JPEG 100%’, and choose the ‘Consumer Presets’ for the folder.
Lastly, click on the Create button.

New export preset ‘JPEG 100%’ beneath Consumer Presets shall be created.
Subsequent time you want to convert the RAW file to a JPEG picture, you’ll be able to altogether bypass the Export Settings Window. You’ll be able to set off the RAW to JPEG conversion immediately from the Library or Develop Modules.

How To Batch Convert RAW recordsdata to JPEG Photos
Within the first a part of the tutorial, you realized how you can manually convert the RAW file to JPEG within the Export Module of Lightroom.
Within the second half, we coated how you can automate the method of RAW to JPEG conversion through the use of the export preset.
And now, I wish to present you how one can take the automation even additional by combining export presets and batch conversion.
Butch conversion means changing a number of RAW recordsdata to JPEG photos in a single go.
Choose a number of recordsdata within the Library or Develop Modules of Lightroom by holding does CTRL-key.
Proper click on on chosen RAW recordsdata, select the Export, after which Export preset ‘JPEG 100%’, which you created earlier.
Now Lightroom takes the entire RAW recordsdata you chose and converts them to JPEG utilizing export settings from the export preset.
That is the method I take advantage of after I must convert a number of RAW recordsdata to JPEG photos.
How To Convert RAW To JPEG: Remaining Ideas
As you’ll be able to see, Lightroom gives us a number of methods to transform RAW recordsdata to JPEG. The quickest and most handy manner for the conversion is to make use of the export presets.
In case you are subscribed to my mailing record, you’ll be able to entry the members’ space, the place you’ll be able to obtain free Export Presets I created for the PhotoTraces group.

When you misplaced the password to entry the members’ space, go to the login web page and click on the Misplaced Your Password choice to generate a brand new password.
In case you are not a member of the PhotoTraces group, you’ll be able to subscribe right here: Free Lightroom Presets